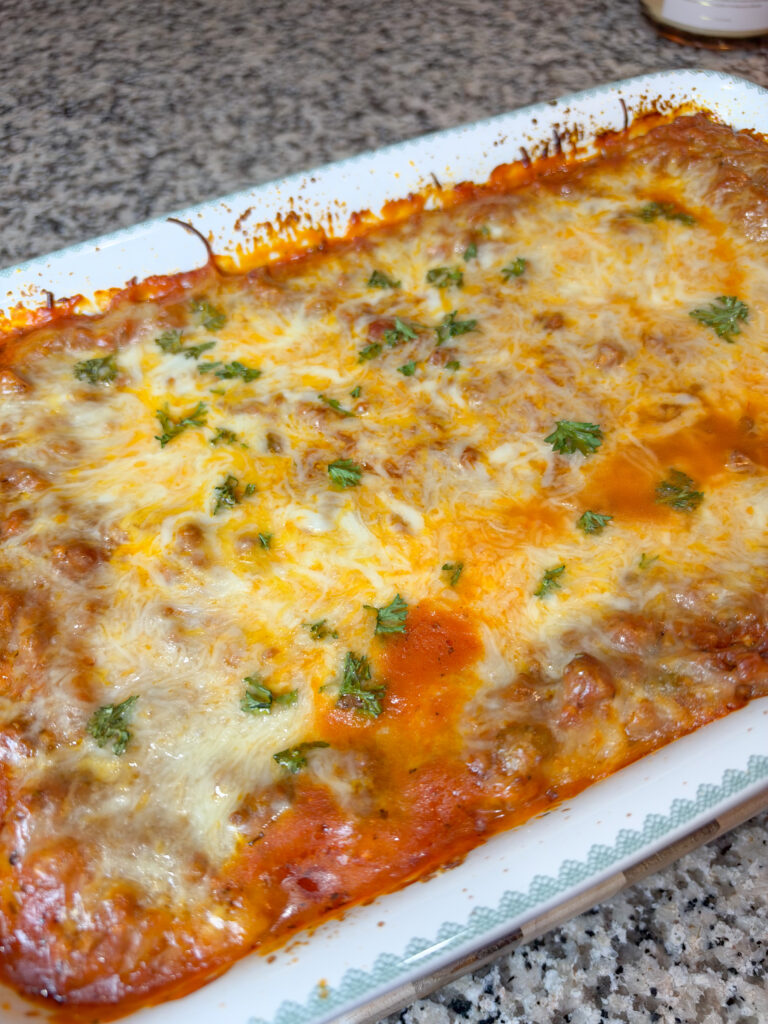
Hearty Meat and Cheese Lasagna
If you’ve never made homemade lasagna before, don’t worry, I got you! This beginner-friendly recipe is easy to follow and loaded with layers of flavor and plenty of melty cheese. Nothing fancy or complicated! This one is perfect for Sunday dinner!
Ingredients
Meat Sauce
- 1 lb ground beef
- 1 lb Italian sausage
- ½ yellow onion diced
- 1 green bell pepper diced
- 2 24 oz jars pasta sauce
- 1 tbsp minced garlic
- 1 tbsp Italian seasoning
- ½ tsp onion powder
- ½ tsp garlic powder
- Salt and black pepper to taste
- Sprinkle of granulated sugar optional, to balance acidity
Cheese Layers
- 8 oz Colby Jack cheese shredded
- 12 oz mozzarella cheese shredded
- Lasagna noodles enough for layering
Creamy Ricotta Cheese Mixture
- 15 oz ricotta cheese
- 1 package 5.2 oz Boursin Garlic & Fine Herbs cheese
- 2 eggs
- 1 cup mozzarella cheese shredded
- 1 cup Colby Jack cheese shredded
- ½ tbsp Italian seasoning
- ¼ tsp salt
- ¼ tsp black pepper
- 2 tbsp fresh parsley chopped
Instructions
Step 1: Prepare the Meat Sauce
- In a large skillet over medium-high heat, add the ground beef and Italian sausage. Cook until browned, breaking the meat into smaller pieces as it cooks.
- Add the diced onion and green bell pepper. Sauté for 4–5 minutes or until softened.
- Stir in the minced garlic and cook for another 30 seconds until fragrant.
- Season with Italian seasoning, onion powder, garlic powder, salt, and black pepper.
- Drain any excess grease if needed.
- Pour in both 24 oz jars of pasta sauce and stir until everything is well combined.
- Optional: Add a small sprinkle of sugar to help balance the acidity of the tomato sauce. Taste and adjust as needed.
- Reduce heat to low and allow the sauce to simmer for 10–15 minutes so all those flavors come together.
Step 2: Prepare the Ricotta Cheese Mixture
- In a large mixing bowl, combine the ricotta cheese and Boursin garlic and herb cheese.
- Add the eggs, shredded mozzarella, and Colby Jack cheese.
- Season with Italian seasoning, salt, black pepper, and fresh parsley.
- Mix until everything is creamy and well combined. Set aside.
Step 3: Prepare the Lasagna Noodles
- Bring a large pot of salted water to a boil.
- Cook the lasagna noodles according to package instructions until al dente.
- Drain and set aside.
- If using oven-ready lasagna noodles, skip boiling and follow the package instructions.
Step 4: Assemble the Lasagna
- Preheat your oven to 375°F.
- Spread a thin layer of meat sauce across the bottom of a 9×13-inch baking dish.
- Add a layer of lasagna noodles.
- Spread a generous layer of the creamy ricotta cheese mixture over the noodles.
- Spoon a layer of meat sauce over the ricotta mixture.
- Sprinkle with shredded mozzarella and Colby Jack cheese.
- Repeat the layers until all ingredients are used, finishing with a layer of meat sauce and a generous amount of shredded cheese on top.
Step 5: Bake
- Cover the baking dish with aluminum foil, making sure the foil doesn’t touch the cheese.
- Bake at 375°F for 45 minutes.
- Remove the foil and bake for an additional 15–20 minutes, or until the cheese is melted, bubbly, and lightly golden.
- Remove from the oven and allow the lasagna to rest for 15–20 minutes before slicing and serving.
Notes
- Shred your own cheese: Freshly shredded cheese melts beautifully and gives you those creamy, cheesy layers.
- Don’t skip the Boursin: The garlic and herb flavor adds an extra layer of creaminess and flavor to the ricotta mixture.
- Balance the acidity: Depending on your pasta sauce, a small sprinkle of sugar can help balance the acidity. Start small and adjust to taste.
- Let it rest: I know it’s tempting to dig right in, but allowing your lasagna to rest before slicing helps the layers hold together.
- Make it ahead: You can assemble the lasagna the night before, refrigerate, and bake when you’re ready. Allow additional baking time if baking straight from the refrigerator.
Discover more from Dinin' With Jas
Subscribe to get the latest posts sent to your email.